
by Debbie Burke
Late Breaking News: This morning, I’m being interviewed by radio station KGEZ (Kalispell, Montana). To listen live, visit KGEZ.com and click at the top left side of the home page. Pacific 8:10 a.m., Mountain 9:10 a.m., Central 10:10 a.m., Eastern 11:10 a.m.
Or you can listen later by scrolling down KGEZ’s home page to “In Case You Missed It.”
~~~
Two weeks ago, I wrote about the inspiring Flathead River Writers Conference. If you missed Part 1, here’s the link.
Today features more highlights from the other excellent speakers.
~~~

Maggie Doherty
Freelance writer Maggie Neal Doherty is a future thinker who knows how to take the initiative. When she realized the local newspaper had no female reporters, she pitched them with her qualifications and scored a regular op-ed column. She also initiated a new book review section at a time when many publications are cutting back on book reviews.
She specializes in finding unusual niches like “Duct Tape Diaries,” a publication by a major raft manufacturer that features articles about river rafting. With two small children, she came up with the quirky angle of waste disposal during family raft trips: “How I Got My Kids to Poop in a Bucket.”
Questions Maggie asks before querying editors:
- What is the story? It’s not just the topic of the article but a compelling reason behind it.
- Why is it important now?
- Why are you the person to write it?
If the topic is “evergreen” (useable at any time), why is the story timely now?
Editors want to know you can deliver the story, meet deadlines, and write within the required word count.
Maggie’s strategy has resulted in credits in The Guardian, Washington Post, High Country News, LA Times, and more.
~~~

Keir Graff
Chicago-based Keir Graff had an enviable former career where he “got paid to read” as the senior editor of Booklist, the primary source for libraries when deciding which books to buy. Now he cowrites middle-grade mysteries with James Patterson, as well as adult and children’s fiction under his own name and with a coauthor under the name “Linda Keir.”
Keir revealed the secrets of a working writer, sharing the hard truth that few authors can survive on book sales alone. He cautions that “writing a book is like buying a lottery ticket that takes a year to fill out.”
He compares writing-related work to an investment portfolio. If you have only one income source and it dries up, you’re out of luck. If you diversify into related fields, like ghostwriting, editing, coaching, teaching, speaking appearances, etc., those other income sources take up the slack if book sales drop. Using a strategy of wearing many hats, Keir has forged a successful career.
While Keir gave straight talk about the challenges, he also offered encouraging, actionable tips to make a living as a writer, including:
- Be the best writer you can be.
- Leverage your expertise. Give talks about your areas of expertise, knowledge of a place, specialized abilities, etc.
- Price yourself accordingly. Start low then increase fees as your experience and reputation expand. Ask clients and speaking venues, “What is your budget?”
- Ask for help, advice, and introductions. Always be gracious if the answer is no.
- In addition to writing, do five things every day. “Things” can be querying, promotion, outreach, networking, following up on queries, building platform, etc.
- Set a goal. Once you achieve that goal, set a new one. Keep setting and achieving goals.
~~~

Zoe Howard
Zoe Howard is an associate literary agent with the Howland Agency and a literary publicist with Pine State Publicity. She walked us through DIY publicity angles for launching a book. She shared sample questionnaires used by PR firms.
About the author:
- Who are you?
- Where are you from? If you moved, why?
- How do you describe yourself to people?
- What is your day job/work?
- What gives you the ability to write this book at this time?
- What interview questions would you like to be asked?
About the book being publicized:
- What are one-word topics about this work?
- What themes are you striving for?
- What inspired this work?
- What timely topics intersect with this work?
- What research did you do?
- How do you talk about the work with different people, e.g. friends, colleagues, your mom?
- Who helped this book along the way?
What does publicity look like:
- Reviews
- Interviews
- Events
- Awards
- Essays/excerpts
- Momentum
~~~

Joanna MacKenzie
“Keep readers hungry but give them cookies,” advises literary agent Joanna MacKenzie of the Nelson Agency. IOW, make readers eager to find out what happens next but give them snacks in the form of hints that will pay off during the journey.
Joanna gave a shout out to TKZ alumnus Larry Brooks and his book Great Stories Don’t Write Themselves.
She offered a rare peek inside an agent’s head with 16 questions she asks when considering a manuscript.
- Is the writing good?
- Is there a market?
- Am I excited to turn the page?
- Am I confused?
- Is the premise unique?
- Is this the right point of view for the story/scene?
- Do I care about the character?
- Are there meaningful internalizations? Is there too much “show” and not enough “tell”? (Note: Refreshing to hear an agent break from conventional wisdom)
- Are there both internal and external arcs?
- Is there a sense of place?
- Is there a compelling conflict?
- Is the dialogue trying too hard to be realistic?
- Is it plausible?
- Is there a beginning, middle, and end?
- Does every scene move the plot and character forward?
- How much work are we going to have to do?
Digging into characters, Joanna says, “If the antagonist has time to lean, they have time to be mean. If they’re not doing anything, put them to work making life more difficult for the hero. Make sure every scene includes a shift in who has the upper hand.”
~~~
The criteria I often use for measuring a conference’s success is the level of interaction among attendees. Sometimes introverted writers are shy about talking with strangers or even admitting they write.
Not at this conference! Conversations were friendly and lively. People freely shared stories about their projects, struggles, successes, interests, and personal lives.
Old friendships were rekindled and new ones made. Business cards and emails were exchanged.
Exhilarating, energizing, and exhausting. You can’t ask for better than that.
~~~
TKZers: In your experience, what makes a successful conference? Want to give a shout out to your favorite?
~~~
Today is election day. Remember to vote.
~~~
For readers who like to hold a physical book in their hands, Debbie Burke’s new thriller Fruit of the Poisonous Tree is now in paperback as well as ebook! Sales link.

Cover by Brian Hoffman

 Go on a global search-and-destroy mission for the following words/phrases:


 An interesting discussion arose while working on copy edits for
 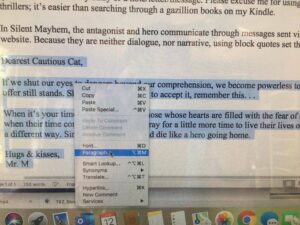 Choose “paragraph” and this screen will pop up…
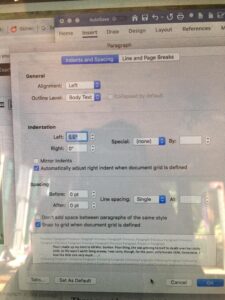

 And that’s it. Easy peasy, right?