Old Dog Learns New Trick

by Debbie Burke

@burke_writer


Public domain photo


When it comes to learning new technology tricks, I’m definitely an old dog. But if there’s a way to learn a new trick in a program I already use, rather than having to master a whole new program, I’m thrilled.

In this case, the new trick is in Word.

Recently I stumbled on a post by Wendy Lyons Sunshine entitled How to Teach Word a Scrivener Trick on Jane Friedman’s always informative blog.

Scrivener is a popular and powerful writing program that number of TKZers use and swear by. One Scrivener feature that’s always appealed to me is the corkboard. You write each scene on a virtual index card. Then if you discover problems with timeline or continuity, you can easily rearrange scene order.

Unfortunately, despite taking several classes in Scrivener, I never mastered the learning curve.

So I continue to use Word since it’s the preferred program for most publications I write for.

For my novel first drafts, I write in scenes, separated by white space and asterisks. In later drafts, I divide scenes into chapters. Some chapters are only one scene long, others are three to five scenes.

A problem arises when I write scenes out of order. That leads to a jumble of scenes that need to be rearranged before completing the final draft.

This is where we pantsers get in trouble. You outliners in the audience, feel free to smirk here.

Eventually I have to find those out-of-order scenes buried in the 75-80K manuscript and, using cut and paste, reposition them where they should be. But locating those scenes, as well as their new position, can be a pain in the posterior.

Being old school, I write a summary of each scene on a 3X5 card. I lay the deck of cards on the living room floor and rearrange them as needed until the scene order is correct.

But…the Word doc still needs to be changed. That requires a lot of scrolling back and forth to find the right scene, highlight and cut it, then more scrolling to paste it into its new location.

Yes, outliners, I hear you snickering. If you had an outline, this problem wouldn’t come up.

But it turns out Word has a trick to mark scenes so they’re easy to find.

Now I’ll give the floor to Wendy since she explains it very well. She graciously granted permission to quote the following excerpt:

“Insert descriptive headings throughout the manuscript. You might insert a heading above each:

  • Chapter
  • Section
  • Scene
  • Any unit of content that needs to be easily identified or moved.

The goal is to clearly identify where a chunk of content begins. By default, that chunk ends where the next chunk (denoted by a heading of the same level) begins.

Assign styles:

Open Word “Styles” and assign each of the descriptive headings a standardized heading style. Assign “heading 1” style to chapter titles, then assign “heading 2” to other types of content.

Open the Navigation Pane

Now that headings are set up, open the navigation pane via View > Show > Navigation Pane. The Navigation Pane will display vertically along the left of the screen. 

Use the Navigation Pane two ways. First, you can navigate to specific content by clicking on that specific heading. Second, and most wonderfully, you can reorganize content by dragging and dropping the headings. Navigation Pane headings behave much like Scrivener’s index cards and are easily shuffled around.

Dragging a heading moves all associated content together in one bundle. This works beautifully across a large document and is far easier than trying to cut/paste/or drag blocks many pages apart.

Fiction writers can adjust this approach for their needs by crafting headings to describe POV, scene, location, interiority, backstory, etc.”

Thanks for making my life easier, Wendy!

After reading her instructions, I went through my WIP (working title Fruit of the Poisonous Tree) and chose Heading 2 for the beginning of each scene. Still using Heading 2,  I wrote a brief summary of that scene, so it stands out easily in the manuscript.

Now, within the Word doc, I can easily jump to the summary of each scene. No more wasted time, scrolling through pages, searching for the parts that need to be cut and pasted to different locations.

When the scenes are in correct order, then I’ll place the chapter breaks, using Heading 1.  That makes formatting easy for Kindle Direct Publishing and Draft2Digital.

Best of all, this new trick is within Word so I don’t need to learn a whole new program to accomplish what I need.

Photo credit: Lars Curfs CC-BY-SA-3.0

Now I’m still an old dog, but a happy one.

~~~

Many thanks to Wendy Lyons Sunshine and Jane Friedman for their kind permission to quote.

~~~


TKZers, were you aware of this capability in Word?

How do you keep track of scenes and rearrange them in your manuscript?

Do you know any other Word tricks to share?

Getting Started With Scrivener

James Scott Bell
@jamesscottbell

I got a comment in last week’s post wondering about the mighty program Scrivener, and speculating on how hard it might be to learn. So today I thought I’d give my overview for those who have been hesitant about taking the plunge.
Now, Scrivener does have a lot of “bells and whistles” that can, if taken in all at once, make someone think, “Sheesh! I can’t possibly learn all this!”
So … don’t take it all in at once! Scrivener is actually simple to use for many cool functions. Any other stuff can be learned at your leisure. (See the end of this post for my recommendation on that).
Here is how I advise approaching Scrivener:
1. Think of it as a binder
Many writers of the past used physical notebooks to house their drafts, notes, research and other items. I’m sure some still do. Well, Scrivener is a digital binder. Everything you generate can be stored here.
My binder always has my scene cards, the manuscript itself, character cards (with head shots), research, clippings (a cool feature is that you can highlight something on the internet and send that to a clippings file in Scrivener), and my novel journal.
All of this material is, of course, searchable.
2. Think of it as a corkboard
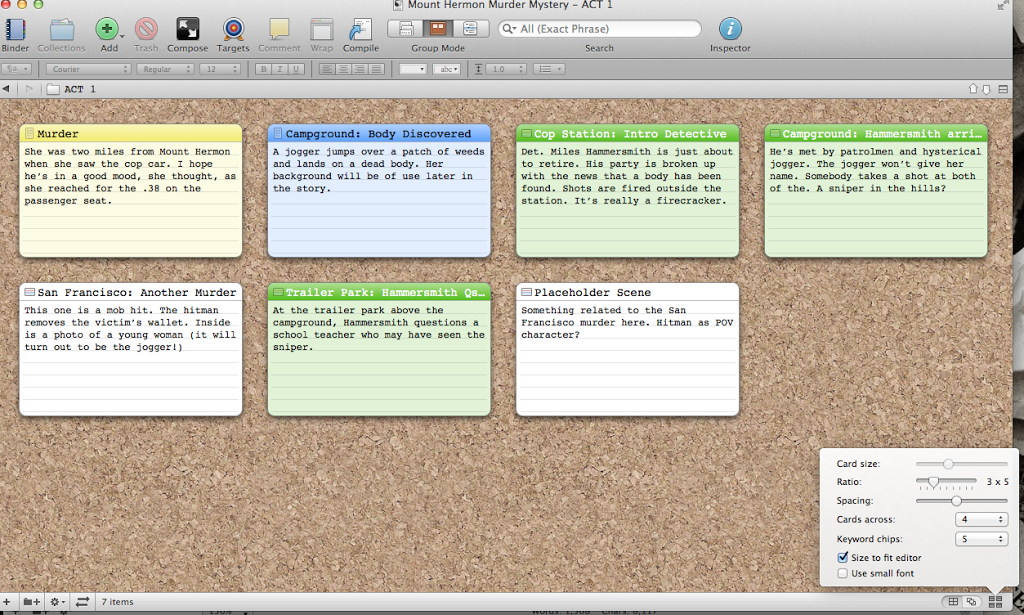
One of my favorite features in Scrivener is the corkboard. It’s just like the one in your office, with the push pins, only this one is virtual. I usually start my projects by thinking up random scenes, jotting notes on Scrivener’s “index cards” and “pinning” them on the corkboard. I can then move them around as I like. Below is a screen shot of a made-up project I created for a presentation:


The jottings you see on the index cards are my synopses of the scenes. Later, if you wish, you can compile only these jottings and voila! You have a synopsis of the whole project. 
 
You can drag a card to a different location and the order of the cards immediately adjusts. 
 
On the bottom right corner is a box that lets you adjust the card size and how many cards across you want. 
You can choose different colors for your cards. I choose colors by subplot. It makes it easy for me to see how the various strands in my story are shaping up. 
 
 
3. Think of it as a creativity booster
Scrivener is extremely flexible, allowing you to shape it to fit your preferred working style. You can create your own templates, for example. I have one for my character work. It contains the key questions I ask about each main character. I can attach a head shot to each character (I search Google Images till I find one that fits) and then bring up these pictures on a corkboard. That allows me to see my whole cast at once. 
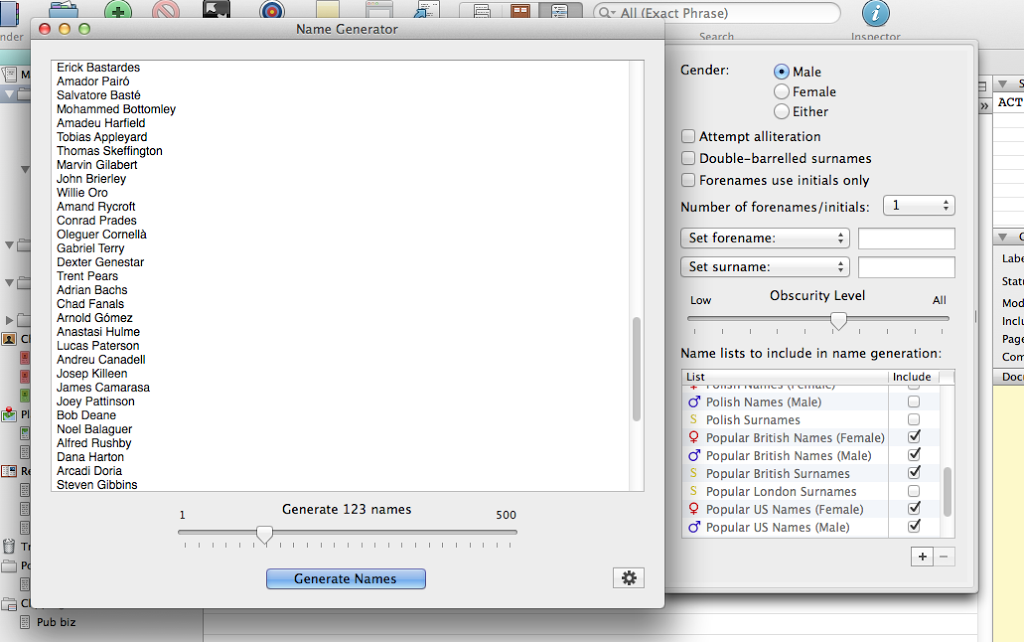
Another tool I use all the time is Scrivener’s name generator. Set your parameters (e.g., nationalities, male or female, etc.) and the name generator will give you hundreds of suggestions with just one click.
 
4. Think of it as an organizer
Scrivener lets you organize your project, and view it, in many ways.
I like to use folders for Act 1, Act 2, and Act 3. When I create a scene card, I can put it into the folder where I think it will logically fit. I can organize the scenes within the folders all I want, moving them around on the corkboard, or up and down on the left side panel.
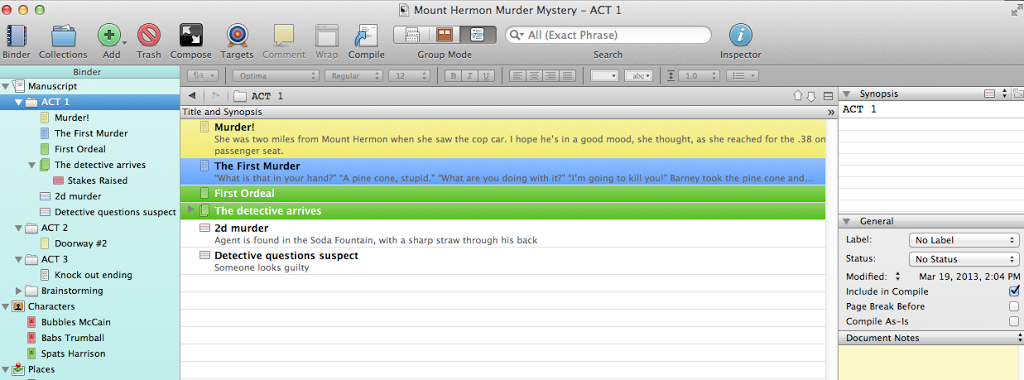
There’s an outline view that’s extremely helpful in letting you know where you are in your WIP. The corkboard view I shared, above, looks like this in outline view:
 
The same color codes are there, and the same synopses. When you have a lot of scenes, you can look at the colors and decide if you need a yellow scene here, or a blue scene there.
If you are a “plotter,” you’ll naturally love all this. But “pantsers” will too! Why? Because you pantsers get all sorts of wild ideas as you write. So what do you do about them? You can jot scene ideas on an index card, even write some of that scene, and put it into a folder for later reference. You can move those cards around as you please. You can pants your pants right off in Scrivener. Then, when it comes time to bring a little order to your mess, Scrivener will help you do it.
5. Think of it as a word processor
You could use Scrivener for all of the above, and still choose to write your manuscript in Word. Even then, Scrivener is worth the price for the reasons mentioned above.
But you can also draft your books right in Scrivener. When you’re done, you can export your book as a Word document, ebook ready .mobi and .epub formats, and print-ready (e.g., for CreateSpace).
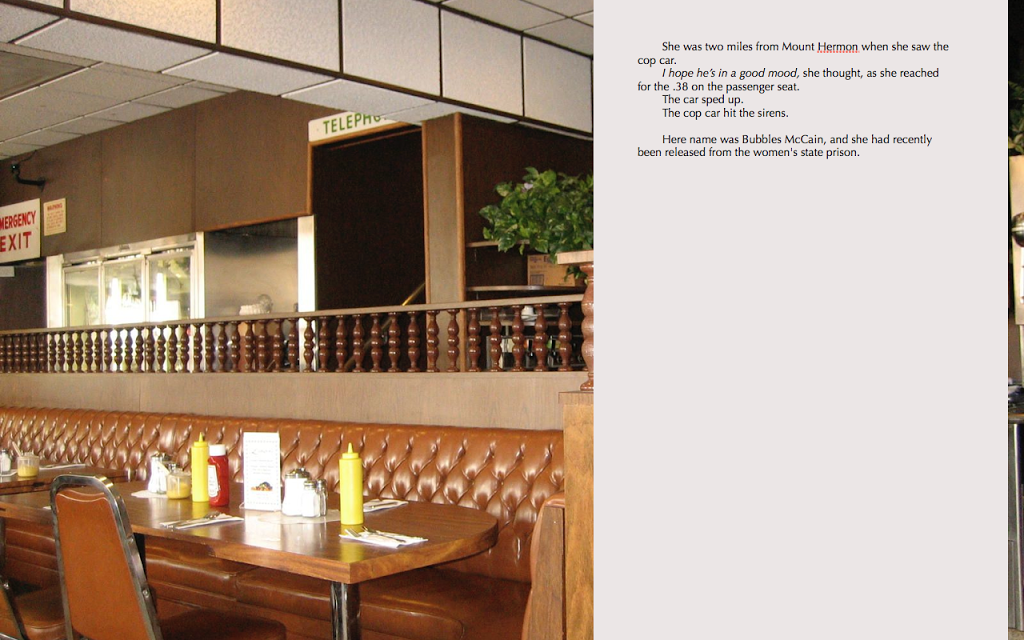
I’ll give you one little “whistle” I like. It’s called the Composition Mode. It brings up your manuscript on full screen so you can type away, and lets you choose a backdrop. I like to use the interior of my favorite Los Angeles deli, Langer’s. It makes me feel like I’m writing at one of their tables. Then I turn on the coffee house background sounds of Coffitivity and it’s like I’m right there, eating a pastrami sandwich and writing my next work of surpassing genius.
 
Okay, I’ve tried in this short space to give you an idea of what you can do with Scrivener right from the jump. So, once again, don’t let all the features intimidate you. You can learn as you go.
There are tutorial videos available for free at the sales site. And books, such as Scrivener for Dummies
Bottom line, even if you get Scrivener and use it only to help plan, organize, and store your research, it’s a good investment. But if you decide to use it to write and create your own e- and print books, you’ll soon appreciate its power.
Any other Scrivener fans out there?

Lessons Learned in NaNoWriMo 2014

James Scott Bell
@jamesscottbell


And so ends another November and the keyboard-clacking madness that is NaNoWriMo. It seems like each time I get a little something different out of it.

This time I worked on the third book in a series (the books will be published close together next year). I did some pre-planning along the lines I’ve suggested before. I killed that first day, hitting 3k words. And I was off to the races.

Only this race had some hurdles.

I did make the 50k mark on the last day, but barely. I lost at least four full writing days due to Bouchercon and a family matter that had me driving a car for about 16 hours over two days. But that’s part of the NaNo experience and a good lesson for writers who want to do this professionally—life often intrudes, but you find a way to write through it. 

The book is not finished, BTW. Since I’m aiming for 70-80k it’s still in production. I’m trying to keep the NaNo MoJo working, though. Which leads me to the following lessons I pass along to you.

1. Deadlines work

Remember what Douglas Adams, author of The Hitchhiker’s Guide to the Galaxy, once said? “I love deadlines. I love the whooshing noise they make as they go by.” Every writer who has written under contract knows what he means. 

The “pressure” of NaNo is good for a writer. If you fall too far behind you’re cooked. So you do whatever it takes to keep to a daily word count. You adjust your goals to make up for lost time. 

Out of NaNo, I’m sticking to a SID — self-imposed deadline. Writing down the date you want to finish and putting it where you can see it daily helps.

2. Scrivener rocks

Scrivener was a big help this year. I made heavy use of the Outline View. Scrivener lets you color-code your scenes and then view them in an outline format. You can customize this view. I show my scene titles, the scene synopsis (which you can generate AFTER you’ve written the scene. Scrivener will even auto-generate a scene synopsis with one click), and my own added timeline, which is of tremendous importance. Thus, I can see at a glance what I’ve done and on what day and time the scenes take place. 

I found this to be valuable as I began the writing day. I did my Grafton journal notes (see my post on that), then looked over the outline which showed what I’d already written, as well as  future scene ideas. In this outline view you can instantly add a scene you think needs to go in between other scenes.

3. Trust but verify

In NaNo there are times when you have to be willing to try something risky, or follow an idea that pops into your head. Pure pantsers love that. No problemo, they say.

But there is a problemo. Unlike what some may advocate, not every spark of inspiration or tangent is good just because it’s new. Indeed, one of these could take you to a bog where your story drowns, and a good deal of NaNo is wasted.

The answer, I found, is to take ten minutes of breathing time when something totally unexpected pops up. Journal about it. Write some notes. (Here again Scrivener comes in handy. Each scene in your story has its own “Document Notes” section. You can record your ideas and thinking there, work things out).

4. Nothing beats full immersion in a story

All writers know the feeling of getting away from a WIP for awhile, then coming back to it and finding it hard to get into the story again. NaNo keeps you immersed in your story. This is good for you and for your novel. Not necessarily good for your spouse. When Mrs. B asked me in October if I was going to do NaNo again, I nodded. And she did not look pleased. So I tried to stick to the final lesson:

5. Don’t forget the important people in your life

I was intentional about trying to carve out evening time with my wife. But she knows me well after 34 years together. I get that faraway look as she’s talking…I have to ask her to repeat things…I nod my head at the wrong time….I excuse myself to go write something….I forget to pick up the milk at the store.

Once I got out of the shower thinking about my story. I went to the sink as usual, thinking, thinking, and put some gel in my hair, brushed it, then got ready to shave. And realized I had put shaving gel on my head and was about to lather my face with hair gel. 

Most writers are like this. We’re strange creatures, rare birds, a little funny in the head. Our loved ones have to put up with this. So be kind! Take them out to dinner and try to forget, for a couple of hours, that you’re a writer.

Unless, of course, you see a particularly interesting character over at the bar…

So anybody got a major lesson or two they’ve learned this year on the writing of fiction? 


Now We’re Cooking

I cook the Thanksgiving Dinner at casa de Hartlaub each year. It involves some basic planning, such as buying a frozen turkey on Sunday. It sits in the refrigerator and thaws and by Thursday it’s ready for the oven. The real planning comes Thursday. I start at 7:00 AM with the pies. The lasagna goes in the over at 9:00 AM and at 9:35 I begin preparing the turkey and its stuffing. The whole kit and caboodle goes in the oven at 10:00 and then I stuff the potatoes, sit back and mfive hours later and it’s time to bake the rolls and prepare the mixed vegetable dish. By 4:00 PM dinner is served.

It occurred to me this year — probably because I had a blog entry to write — that preparing Thanksgiving dinner is a lot like the act of writing. The first and foremost step is that I have to get up and start. Getting up whenever I happen to wake up and having a cup of coffee and taking 20 to 30 minutes to transition between into it is not going to do it done. Before I know it I’ve lost half of the day. I have to get up and start.

The second element is making a schedule and doing everything I can to stick to it. Sometimes things, like life, get away from me, like that fire in the kitchen. We still had dinner that Thanksgiving, however, even though the dog got part of one of the pies. Since there were all males in the house, however, we ate the rest of it without worrying about germs. So too, when I’m writing: sometimes the idea will get away from me and I’ll find myself far afield, being just as clever as can be but not with anything that helps the story. I drag myself back and get on target and on schedule. And the sooner that I do that the better off I am.

The third element is the possession of the proper tools to get the job done. I discovered at the last minute that I didn’t purchase one of those turkey broiling pans that I use every year (one dollar at uh, The Dollar Store) and had to go out and get it. I had everything else all lined up and ready to go. Writing, I use Word and Google docs, but when my computer crapped a sandcastle while I was in New Orleans in September I used Evernote on my T-Mobile MyTouch to take notes and write whole chapters. My fingers will never be the same, but I got it done.

The fourth step is sticking with an outline. My outline for dinner is laid out above in my first paragraph. I have a more difficult time outlining a novel, but I’m finding that things work out a lot better when I do; otherwise I dislocate my arm patting myself on the back for a great beginning and a strong ending. It’s hard to fill that vast expanse of white space in between the beginning and end when your arm is dislocated. I’ve started using Scrivener, and that helps. It’s almost as good as…well, as a reliable oven.

That aside: I hope that you had a great Thanksgiving. I’m thankful to have lived much longer than I really should have and to have the love I don’t really deserve from so many wonderful people. That would include, first and foremost, the family I prepare dinner for every Thanksgiving, and who are my most loyal readers. And it would include you for stopping by here regularly. Thank you, and God Bless.

Timelines

by Michelle Gagnon

I’m attempting to finish a draft of my current WIP by the end of the week, so this post will of necessity be brief. And in lieu of dispensing advice, today I’m hoping to receive some.

Here’s my issue: timelines.

By the end of a book, I always hit a point where I realize that the timeframe in which the story is taking place has become hopelessly jumbled and needs some sorting out. For example, my characters might have suffered through an extraordinarily long night (which is only helpful in vampire stories, really), or there’s a sudden, jarring leap from dawn one day to dawn the next with little or no interlude.

Generally I spend a few days going back through the story and sorting that out. I mark on an Excel spreadsheet which day the story starts on (which is generally randomly chosen, ie: “Monday, March 6th”), and plot out scene by scene what approximate time and day everything is transpiring on.

But it occurs to me that there must be an easier way to track that during the writing process.

I’m using Scrivener for the first time with this manuscript, and it has in many ways transformed how I write. I find that my scenes tend to be longer. I have a much clearer sense of point of view shifts thanks to their handy color-coded virtual index cards. I love that I can shift scenes around with abandon.

But the one feature that appears to be lacking is some larger calendar on which I could keep track of WHEN the scenes are happening, not just where and to who.

So I thought I’d throw this out there: does anyone have a better system to recommend? A program that makes it easier to manage timelines during the writing process?