
By Jordan Dane

I’ve never been a plotter. I’m too impatient. Once I get the general idea of a story with a compelling conflict and a notion of my cast of players, I can’t wait to “discover” the story as I write. It plays out in my head like a movie, but I’m constantly exploring new ways to get organized so my daily word count goals can be achieved without roadblocks.
Today on TKZ, I submit my latest thoughts on the 3-Act Structure and the Storyboard method of plotting. These are purely my thoughts on combining these concepts as they might apply to my writing, but maybe you’ll see elements you like in this for you.
I used to think of the 3-Act Structure as beginning, middle, and end, but I’ve read it more accurately reflected as Establish, Build, & Resolve by Michael Hauge in his book “Writing Screenplays that Sell.” Thinking of these acts in this manner denotes movement. So imagine these three segments as buckets, but before I can toss wads of paper (or scenes) into these buckets, I must have a place to start. Set aside your buckets for now and grab a paper and pen—or Sticky Notes, colors optional.
Presuming I have a general notion of my book, I would create a list of 20-25 things I know about the action in my book in terms of what I call “big ticket” plot movements. No backstory. What will go on my list will be scenes that I envision as key elements to my story. They won’t be put into any order. I merely list them as they occur to me. I would brainstorm without censoring my thoughts. I heard an author talk about creating notes on 3-M sticky notes, rather than a random list, but you get the idea. I don’t expect to know every scene in my book at this stage. The storyboard I create will be an evolving beast that I will change as I write, edit, and final my book so I can see my plot at a glance.
Now let’s talk about the 3-Act Structure in terms of a BIG “W.”
ACT I – Establish – The start of Act I (or the top left of my “W”) is the Triggering Event. It’s the inciting incident that will start my story, the point at which my main character’s life changes forever. As I travel down the left side of my “W,” I head for the 1st Turning Point that usually sets up the problem or the first low point or perhaps a moment of hope. This is a reversal point that changes the direction of my plot as I head out of Act 1. I’ve “Established” my world up to this point and the general conflicts and players in the first 25% of my book, in theory.
ACT II – Build – As my plot heads toward the upward middle of my “W,” that is another key reversal. If I have a book with hope in my first turning point, this shift might dash those hopes to some degree. If I have a dark moment in that first turning point, things get worse, but the plot takes another key turn one way or the other as the action “Builds.” Act II ends with the next turning point (the 2nd low point of my “W”). This is the black moment where all seems lost. This part of the “W” represents the middle part of the turning point structure or 50% of my story, the “building” middle.
ACT III – Resolve – Now I would be in Act III, the last upward line of the “W” after the black moment. I’m headed toward resolution. In this section, my hero or heroine might discover something about the villain in the story that is his or her weakness. He or she implements a plan to take advantage of this Achilles Heel, but I might consider throwing in another epiphany or twist before the end. This could be a twist or complication—an “Oh my, God” moment the reader might not see coming before the world is restored or the ending happens. This last part of the structure is the final 25%.
I’ve oversimplified these blended theories for the sake of this post. The lines of the “W” don’t have to be linear, for example. I could have little ups and downs along the way that will take me through my book, but I wanted you to have a general idea of how this could work.
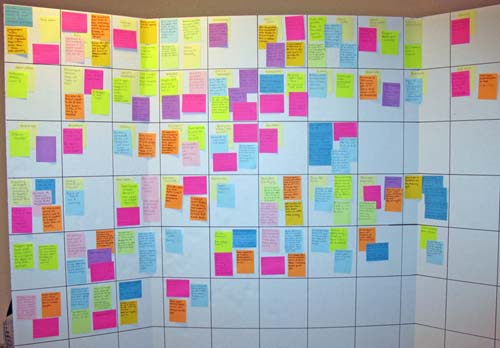
Now get ready with your buckets. Each of these acts is a bucket, for the purposes of this explanation. So the list I created at the beginning—the 20-25 brainstormed scenes—each has a place in an Act Bucket. I would add to these 25 things as I get more familiar with my book, but if I were to Storyboard this out, I would create 20 squares that represent chapters in my books. (You might write differently, so make this work for you with your average number of chapters in a single-title book.) I would write my 25 items down with each one going on a 3-M Sticky Note and place them on my storyboard where I think they will go in Act I (25%), II (50%), or III (25%). Since each of these scene ideas is moveable, I can change the order and chapter they might appear to get the pace and building intensity up. Once I see things on my storyboard in a visual manner, I will no doubt want to add more Sticky Note scenes to fill out the detail and transitions in my story as the plot develops.
I generally have 4-5 scenes in a chapter. So as my story plot movement gets established and building toward a resolution, I perhaps can add colored notes to signify POV switches or character story arcs or relationship arcs to deepen my story understanding. I thought this process might fit my “pantser” approach to structure with a simple method that I can see visually as I write and evolve the story. Writing software seemed too complicated to learn with my writing schedule, but I’d love to hear of a simple brainstorming plot method or storyboard concept if you have one.
What works for you?
I do something very similar. I’ll take a blank white poster and divide it into 20 squares. Then I put plot points on Post-Its and stick them around the board. Later, after I’ve written the chapter, I’ll ink in the storyline. I use different colored inks for when a character appears for the first time, for loose ends that have to be answered by the end, and for clues leading to the killer. Then I have a permanent visual reference.
Excellent visual method of plotting, Jordan. The W technique is a simple yet thorough approach to building an outline. I can see this helping just about anyone, especially those writers who might be stuck and need an exercise to help restart the story.
Lynn Sholes and I don’t use a diagram such as you present here, but we brainstorm the story repeatedly, especially when we are in the beginning stages of starting a new book, as we are right now. We start with a basic synopsis that states the beginning and end of the story with some general ideas for the middle. The synopsis can be nothing more than a few paragraphs. From there, we start building ideas and insert them into the synopsis in what we call “snapshots”–scenes that we expect to appear in the book. This is the stage of the planning in which we conference call daily. At some point in this process, one of us feels compelled to start writing, and a first chapter draft appears soon after that. As we progress through the book, we will expand the synopsis using it as a “road map” to refer back to.
For my co-writer and I, it’s vital that we know how the story begins and ends before we start writing. The stuff in the middle is really the fun part because it comes out of the ether as it happens.
I’m glad someone is talking about how a pantser can do it. I can’t outline, but when the topic of structure comes up, it’s invariably wrapped up with “You must outline.” This doesn’t require the writer to know anything up front. I probably couldn’t come up with 25 scenes up, but I would be able to add ones as I went along. Will have to think on it.
http://www.margielawson.com/lecture-packets/empowering-characters-emotions
Wow, Jordan.
Love the visual.
I like Nancy’s idea of the posterboard too.
Alexandra Sokoloff details a similar method, drawn from her screenwriting background, and posted it on her site.
Learning the process of writing as I read Alex’s posts and her book on Screenwriting Tricks For Authors, I went back and analyzed my first book – and, OMG, I hit the major turning points at the right places. That was an epiphany for me.
I like the forward motion of the “W”.
Paula
Your process does sound similar, Nancy. Thanks for sharing it. I like the idea of your visual reference evolving. That sounds like it could help with edits.
I’ll put in another good word for Scrivener software. You can learn the basics in half an hour and it will do everything you mention here, Jordan. The benefit is that you have different ways of “seeing” your project (there’s even a corkboard view, index cards you can make various colors and move around). Later, as you get closer to writing, you can have the program spit out an outline, look it over, change it, etc.
It works for both NOPs and OPs (No Outline People and Outline People). For example, you could create folders (“bucket”) for the three acts and as you brainstorm index cards, drop them without any order into the folder you think applies. Then you could go to the corkboard in each folder and look a the cards and rearrange them, as you would sticky notes. The advantage is you can write partial scenes, too, as the ideas come to you. At some point you could print out a document with all the scene partials and it would operate as a synopsis which, with a little tweaking, you could submit to an agent or editor.
The many other bells and whistles can be picked up as you desire. But just the storyboard functionality alone is easy.
Joe–I am constantly impressed with how you work with Lynn. Brainstorming with another author on every book would be cool. I like your notion of knowing the start & end to your book, with maybe any big scenes inbetween. That fits me too. I also like having a road map visual that evolves. Thanks for sharing your process. You’ve given me more to think about.
Hey Linda. Thanks for your comment. We “pantsers” struggle with the idea of developing some hybrid method that gets us more organized yet respects the organic nature of our process. I’m glad to hear this resonated with you too. This notion of evolving a story with a visual aid, that you can see from a distance, could help smooth out any plot obstacles too.
Hey there, Paula. Good morning. I’ve been noticing how much screenplay writing is similar to fiction writing, only it’s a stripped down, bare essence kind of thing. Any author can learn from it. Alexandra Sokoloff is amazing. Love her.
Actually, Jim, I was hoping you’d weigh in about Scrivener. I know you’re a fan & use. That alone should be recommendation enough. I like the partial scene idea & how that could build a synopsis. Thanks for sharing.
Love this and thanks for the picture. I’m a visual person and not a fan of the writing software, either. Total panster. I use a set series of 3 “what” questions followed by a “how” for each scene. When I get stuck, I write and “interview” with the character to brainstorm. Fan of the “different colors of ink” or font similar to what Nancy suggested. Thanks Jordan for the great idea.
Your “what” & “how” & character interview sound interesting, JC. Very innovative. Thanks for sharing your “pantser” method.
One word: Scrivener!
I must agree with Mr. Bell, my days of index cards and post-it notes are over.
If you have 48 minutes, the very funny Yuvi Zalkow, does an entertaining presentation on those elements of Scrivener he best enjoys.
http://yuvizalkow.com/presentations/scrivener/
The actual Scrivener tutorial only takes a few hours and though it seems like you’ll be taking time away from writing, in the end the time savings gained by using the software far out ways the initial investment.
Tanis Mallow
When I first started writing YA books, the publisher required that we develop a synopsis (less than a page), followed by a chapter outline. The chapter outline included a 1-to-2 paragraph summary of the major developments in each chapter. I still find myself using that method as a starting point. I often deviate substantially from the chapter outline by the end of a manuscript, but it gives me general guideposts as I’m working, plus a sense of the ultimate destination. I find that it’s relatively easy to write a chapter outline when I’m in the first throes of developing a novel-length story idea. Going forward, I could see transposing that method to Scrivener, which is now available for PCs (hooray!). I’m just used to writing the outline out longhand. By now I have a decidedly low-tech collection of chapter outlines written in goofy-looking spiral notebooks. I always choose a notebook with an outrageous cover to get a new project started.
OMG, Kathryn. Chapter outlines would’ve freaked me out, but I can see if it had become your process, that you’d keep doing it. My proposals usually have a synopsis of varying lengths, but an outline by chapter is a real commitment. No wonder you pick fun notebook covers to start.
Thanks for the ditto on Scrivener, Tanis. I’ll have to check into it again.
I am new to the blog and look forward to learning from everyone. Scrivener is well worth it!
I’m a pantser and outlines, writing software just don’t work for me. This looks like it would give more freedom.
I’ve never been a great outliner. My college term papers were usually written in all-night bursts, structured as I went along. When I was plotting out my novel Tainted Souls I knew I’d need help. I used mind-mapping freeware called “FreeMind” to help build scenes. It easily allows you to move elements around or insert new scenes between old ones, as well as make notes about characters, locations, etc.
Hey James–Thanks for your input. More support for Scrivener.
Sonya–I’m so glad this looks like it might work for you. Thanks for chiming in.
Hey there, Steven. I’ve heard of Free Mind. I’ll have to ck it out. Thanks.
In about two hours I’ll be lying on a table floating in la-la land while a doc cuts into my foot to take care of an old pain too long untended.
As I prepare to head in I’m getting my laptop ready to join me in my 4-6 weeks of lounging about and just reloaded a program called CELTX that seems to do a lot of the same stuff Scrivener does. I’ve used it primarily for writing play scripts and am currently writing a screen play for a movie being done at my church. Lots of great tools and useful gadgets that really help.
The film itself is a retelling based on The Lion, The Witch, and the Wardrobe…but its been Basilized. Should be out on youtube around Christmas time.
I was thinking of you today, Basil. Hope things go smoothly for your procedure and that the drugs are good.
Your “Basilized” play sounds like a great exercise to get use of that software. Please share what you learn when you can.
Take care, buddy.
Good afternoon, Jordan. There’s much to digest and love here. I agree with you re: the writing software. It’s great stuff, but I have trouble with it. Post-its I can handle. I saw Kelly (1/2 P.J. Parrish) Nichols demonstrate something similar with Post-Its a couple of years ago at Killer Nashville. If that can work with a collaboration, it can work for the multiple voices in my head. Thanks!
Some people might be concerned about multiple voices in their head, Joe, but at least you never go home alone.
I heart this so much I want to take it down to the corner diner for a bacon cheeseburger and curly fries.
This is a post that will be printed out and kept.
Thank you so much! The look inside the mechanics helps me so much! It’s like the fact that I understand electricity, but don’t know how to wire something until I read the diagram and have someone show me.
Iz all up in your brainz, siphoning off yur stuff!
Terri
Ha, Terri! Have dessert too. Cheers!
Great tips! I love to outline. I am a visual person, so outlining helps me “see” my story. I like your idea of sticky notes. I might have to try that one!
I outlined my book, “The Dragon Forest” and although I deviated from it slightly, the outline provided that structure I needed.
Hey Ruth–Thanks for sharing your process. I like the sticky notes because it’s halfway between a full outline and pantsing. YOu can evolve the story as you go too. Have a great weekend and happy writing!
I found this post (and all the comments) very interesting as I’ve written each of my books using different ‘methods.’
I’m going to check out Scrivener and if the software doesn’t grab me, I’ll try again with the post-its.
Hey Kathy. All the comments were interesting. Glad you enjoyed the post & everyone’s contribution. Hope something clicks for you.
I now have a smaller version of your whiteboard and a stack of generic postynotes (I hope the magic isn’t in 3M).
It sure can’t hurt and I need to learn more discipline and structure as I get deeper into the project. You can’t freestyle until you have a grasp of the basics.
Terri
I’m with you, Terri. Have fun with the great experiment. I’m finishing a project now, but can’t wait to start another one with this method. I’ve applied these principles to my current WIP and it’s amazing how the “W” works even after the fact, but breaking it down ahead of time would probably safe time. Good luck!! Let me know how it goes. I’d love to hear.
Wow. Now I see why your books are soooooooo good. Great technique here, Jordan. Why am I not surprised?
Strange thing, Piks. I think my brain has been working on this concept for a long time, but it wasn’t until I sat down to do this post that it all came together. That Michael Hauge book and his 3-act definition triggered this for me. My last piece of the puzzle.
I also loved all the ideas shared here too. I love TKZ AND you.
Great comments all. After finishing my last novel, I couldn’t bear to look at the computer. I bought neon notecards (a different color for each POV character) and then wrote 75 stream of consciousness scenes. I spread them out on a sisal rug I have in my studio and spent three hours moving them around like puzzle pieces until they comprised a rough but linear plot, making sure not to have too many of the same colored POV cards in a row. Now I have an outline I can use for my first draft. Also keep a notebook with backstories of all my characters in it for future reference. Got me out of my rut!
Good instincts, Antoinette. Any way to take a big picture look at our work, that works for the author, can be a great tool. Thanks for sharing your method. Happy writing.